

I’m sometimes asked about my podcasting workflow, how SQPN goes about recording, editing, distributing, and promoting our shows. This is the fifth in a series of posts that explain the multiple steps that take me from the beginning to the end of the process for each show we produce. The first post was about my hardware setup, the second was on research, prep, and organization, the third was how I record the shows, and the fourth was how I edit the audio.
Once the editing is complete, I have a single uncompressed WAV file of the show, which if it's an hour-long show, could be about 1GB in size. Obviously, this is not ideal for a podcast. From here, we need to compress the audio into a distributable format, create the various pieces of artwork for the cover art, the web site, and social media; create an audio-only video for YouTube; post the episode to the website, which will then distribute the show to the various podcast directories; create and schedule a series of social media posts to promote the episode; and do all the organization cleanup and preparation for the next episode.Episode Art
The first step is to create the episode art, for which we need some type of photo or illustration. For some shows, I use stock photos from either public domain, Creative Commons, or paid stock sites. For others about particular shows or movies, I'll look for screengrabs or promotional art. For personal shows like Raising the Betts, I'll sometimes use personal photos. They key is to find photos in the highest resolution possible.
Some of the final art will be as large as 1400 pixels by 1400 pixels, which is quite large and so I want to get as close to that or even higher if possible.
Once I have the image, I go to Adobe Spark, which is a web-based application in the Adobe Creative Suite. While I could use Photoshop for this, it's a bit of overkill. Spark has just a few tools and is tailor-made for social media images. When I first create a new podcast, I design the template for the podcast art (typeface, placement, shading, etc.) and just copy the most recent one and replace the photo and text with the new photo and text. In fact, I create two files. The first is rectangular and this is set to whatever the optimum size for Facebook post images is (which has historically changed way too often). The second is square for use in both the podcast episode cover art and the Instagram post. (For this I duplicate the rectangular one, then resize, crop, and what not to get it to work for that shape.) I then download the files as PNG to my computer.
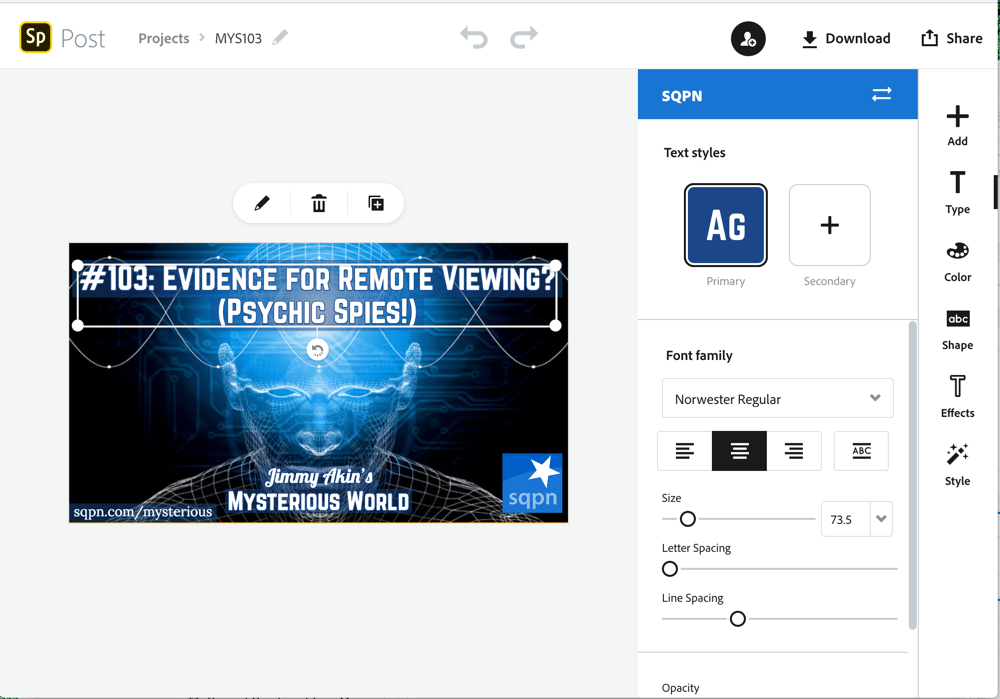
From there, I run them through a program called ImageOptim to reduce the file sizes without reducing image quality noticeably. Then I create a smaller version of the rectangular art at 770px wide for the SQPN web site and then a smaller version of the square one at 1080px for Instagram. I've automated these steps somewhat using Automator Workflows.1
The first is called "Resize Podcast Art for SQPN Site" and it's the simpler of the two.
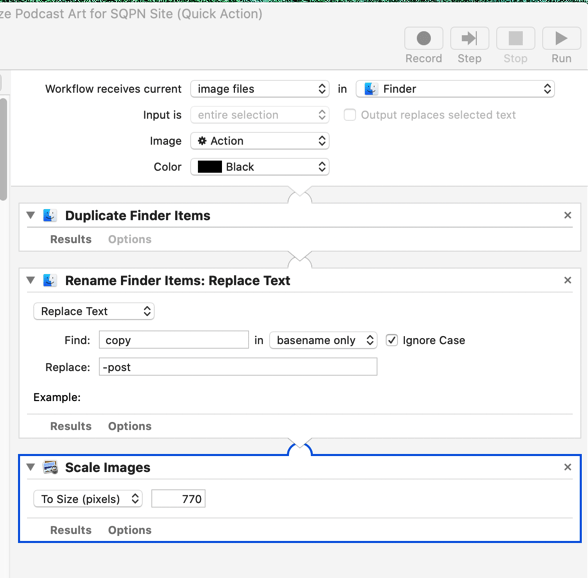
It simply takes in any image file, duplicates it, renames the duplicate by adding "-post" to it, and then resizes the width to 770 pixels. (that's the optimum size for our web site.)
The second is more complex and is called "Create Instagram version." First, it takes the selected image file (whose name must end in "SQ") and resizes it to 1400 pixels because that is the correct size for podcast episode cover art. Then it duplicates the file and renames it, replacing the "SQ" with "IG". Then it runs a shell script that changes the image resolution to 72 dots per inch. Finally, it resizes the new image to 1080pixels for Instagram.

Because I create these workflows as Quick Actions, they are available in the Mac's Finder if I right-click/control-click on the file to bring up the contextual menu, and navigate to the Quick Actions sub menu, but there's a better way using a little program called Service Station. It's a simple little app that moves your most used contextual menu functions to the top-level of the menu. So when I click on an image file, I can quickly select one of the workflows or ImageOptim right away. It saves a little bit of time every time I do it, but that saved time adds up not just in seconds saved, but frustration saved from prematurely closing submenus and such.
Forecast
The next step is to prep the final audio file. For this I used a free app called Forecast2. With a new session window open, I drag in the WAV file created at the end of editing (as seen in my previous post) and it begins compressing down into an optimized MP3, which I have set to 64kbps mono.3 This is necessary because the final mixdown file can be over 600MB for an hour-long episode, while the final MP3 can be 30MB.
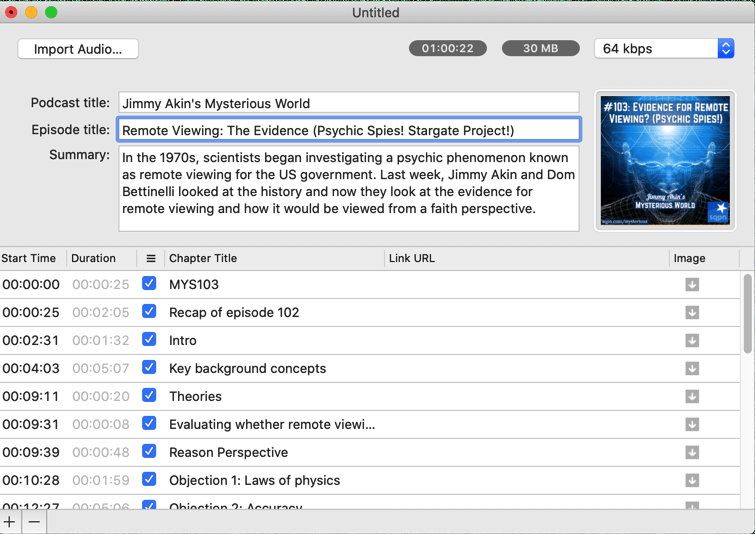
Forecast is smart enough that if I use a standard naming convention for the files, it can bring up the standard details for each different show. For example, if the file is named MYS103-mixdown.wav, then it put "Jimmy Akin's Mysterious World" in the Podcast title space; put "103: " in the Episode title; and populate the episode artwork with the most recent artwork from the last episode. And if I put chapter markers in during the edit in Audition4, it will populate those and even put in the correct link URLs for standard links, e.g. feedback or donation links. Then I just have to write the summary and save the file to the drive.
The summary is an important step because it becomes the basis for not just the web site post and the podcast directory listing, but also for all the social media posts. It can't be too long so as to fit within the 280 characters bounds of Twitter; or at least it has to be easily editable into 280 characters. And it needs to have the participants' names.
Adobe Premiere Rush
The last step before I can start posting everything online is to create a video file for YouTube. To be clear, we don't record video of the participants in our shows. This is an audio-only file with the episode artwork as an image placeholder. While I prefer to listen to podcasts in a dedicated podcast app on my phone, there is a not insubstantial number of people who will listen to audio podcasts on YouTube if made available there and some of our episodes have had tens of thousands of listens on YouTube, so it's worth it to take the bit of time required.
For this process, I used Adobe Premiere Rush on my Mac. I used to use iMovie, but we wanted to start adding animated overlays to encourage viewers to subscribe and Rush has them while iMovie does not. The creation of the video in Rush is simple. Just create a new project, select the large rectangular cover art and the final MP3, place them both on the timeline, make the time-length of the artwork the same as that of the audio file, then drop the animated sequences at the beginning and end of the file. Finally, I export the movie using fairly conservative settings. After all, since it's not really a video, we can keep the file size small by making it 720p resolution.
At this point, we can start uploading the files.
Libsyn
Libsyn is a podcast hosting service, and while it is designed to be a complete solution for hosting and distribution, we primarily use just as online storage; it also provides us with statistics on downloads. The hosting plan charges for a certain amount of storage per month, not bandwidth, so no matter how popular the podcast gets, we only pay for how many megabytes of files we upload (which is why I try so hard to keep file sizes down.) Our plan gives us so many megabytes per month and we generally use nearly all of it.
I use a Mac app called Dropzone to upload the file to Libsyn. Dropzone lives in the menu bar and I've set it up with the necessary information to use FTP to put in our Libsyn account. Just drop it on the icon and it goes. Then I go to the Libsyn site, select "Add New Episode" from the menu, select the file I just uploaded from the storage space, give it the episode details, and then either set the schedule or tell it to publish now. That will then give me a live link to the file, which I can use in the next step.
Website
Our website at SQPN.com is the primary distribution mechanism for our podcasts. It's a WordPress site and each episode is a "blog post". We use the Blubrry PowerPress podcasting plugin as the main engine for distribution. Each show gets its own Post category and PowerPress attaches itself to the post categories you designate, and connects itself to the major directories like Apple Podcasts and Google Podcasts and so on. Each category has its own RSS feed, a specially constructed XML text file that contains the necessary episode information for podcasts.
So for a new episode, I create a new post. The episode title goes in the post title. The body of the post gets all the show notes, including the summary, which will all end up in the podcast apps as the show description. The excerpt space gets just the summary and that's what will show on the main page of the web site. The Libsyn link goes in to the Media URL and the square episode artwork goes in the same place. The rectangular web site artwork gets put in "featured image" and--very importantly--the show is checked in categories.5 And if I'm doing this in advance, as I usually am, I set the posting date as well. When I'm satisfied all is well, I hit the schedule or publish button.
YouTube
Meanwhile, I use Dropzone again to quickly upload the video file that I've created to the SQPN YouTube channel. I add in the title and summary, often editing the title to make it more catchy and better for the recommendation engine. I also add appropriate tags and then schedule it for release.
Social Media
Now begins the promotional part. We have a set release schedule for each show and then we try to have at least three social media posts on three separate days over the following week to maximize exposure. In general, we have the StarQuest Facebook page, our Twitter page, and our Instagram page. We have a handful of other Facebook pages and Twitter accounts for particular shows, including those set up by individual show hosts, that we also post to. I use the Facebook Business interface for the initial release-day post because it allows me to tag the panelists whose names are in the summer, which you can only do natively on Facebook. Because they are tagged, they'll get notifications when the post goes live and it encourages them to share the episode to their friend networks.
For all Twitter and Instagram and the 2nd and 3rd Facebook posts, I use Hootsuite, a social media dashboard. Here I can schedule for multiple services very quickly, looking at a calendar of scheduled and past entries while I do so, to ensure consistency and coverage. I usually have to edit the Twitter posts down to 280 characters and since links don't work on Instagram, I have to boilerplate language the directs followers to a link in our profile that goes to aspecially formatted page on our site suitable for mobile users.
Cleanup
Finally, we get to the last part, which is cleaning up and archiving. I try to save all the important files for every show in case I need it in the future. Because the set of files for each episode are quite large (sometimes up to 6GB), I store them on Network-Attached Storage, large redundant hard-drive arrays. Those NAS are themselves backed up into the cloud on Amazon AWS Glacier storage, which is inexpensive for large sets of data.
I've recently streamlined the process of moving the files to archive using one of my favorite automation programs, Hazel. I have Hazel watching each show's folders and when I tag an episode folder as "send to archive", Hazel mounts the NAS drive, copies the folder, moves the original to the trash, and then notifies me that it's done. That used to take a lot longer for me to do manually.
Wrapping Up
And that's mostly it, except for a few show specific variances and some organizational and maintenance tasks related to when the show actually releases. Writing this out in five separate blog posts illustrated for me how much work goes into every episode of the dozen or so shows I'm responsible for. Not to mention all the other administrative work I do.
While no one else's workflow will be exactly like mine, hopefully there's enough here to help others who are looking for help, looking to get started, or looking for ideas to be more efficient. If you have questions about any of this, I'd be happy to give what answers I can.
- Automator is an app that comes with Macs that allow you to create simple or complex automations. ↩
- It's technically in beta, but it's been around for years now and it's used by dozens of podcasters. It's as stable as anything I've used. ↩
- Our podcasts are primarily spoken word and we think our audience values smaller file sizes over superfluous audio quality. It also keeps our costs lower for distribution. ↩
- Only a very few of our shows merit chapter markers. ↩
- If I forget this step, the show never gets sent to subscribers! I've done this before occasionally. ↩